

Today I am sharing how to make shiplap with plywood and, spoiler alert, this plywood shiplap turned out amazing! If you want to transform a room into an old vintage farmhouse style then you will love this vertical shiplap.

After completing this project I couldn't wait to share with you how to make shiplap with plywood. We created an accent wall in a bedroom running the boards vertically but let's rewind and talk about why I chose to make this shiplap wall.
My daughter and I decided it is time to give her bedroom a facelift. And since she loves vintage decorations I wasn't surprised when she asked for a vertical shiplap accent wall. While there are many different ways to create the look of shiplap, I thought a plywood shiplap wall would give more texture and authenticity to the overall look.
When we started thinking through how to make her shiplap wall I knew I didn't want peel and stick shiplap wallpaper as we did in my guest bedroom. And we considered making the shiplap with a sharpie as we did with this faux beadboard in my closet but that wasn't right either.
Old homes with shiplap walls are not perfect and honestly, that is what I love about them. You can see the texture in the boards, areas where the saw cut is not straight. The imperfection has beauty in it.
We wanted to give the room a true vibe and a faux shiplap wall didn't feel right. We were going for a Cottagecore aesthetic without spending a fortune and I had a feeling plywood would do the trick. Let's just say it didn't disappoint us.
Now that you know the back story about hanging shiplap made with plywood let's break it down into simple steps so you can make some too.
How to Make Shiplap with Plywood
To begin you will need to measure your wall or room to determine how many sheets of shiplap you will need. We only did one wall that was 8 feet tall by 10 feet wide. We hit the hardware store and ended up with three sheets of plywood to cover the entire wall.
This post contains affiliate links, which means I receive a commission if you purchase at no cost to you using the links below. All opinions are all my own.
Plywood Shiplap Supplies
- 1/4″ sanded pine plywood
- 1 x 4 wood
- Table Saw (we use Ryobi products)
- Stud finder
- Miter saw
- Skill saw
- Sander (with medium and fine grit)
- Tack cloth
- Level
- Chalk line
- Nail gun (you can also use a hammer and finishing nails)
- Spackle or painters putty
- Kilz 3 Primer (if you plan to paint)
- Paint (we used Sherwin Williams Escape Gray SW 6185)
- Pencil
Shop Supplies:


Now that we have all the supplies and right tools, here are the steps on making plywood shiplap.
Plywood Shiplap Wall
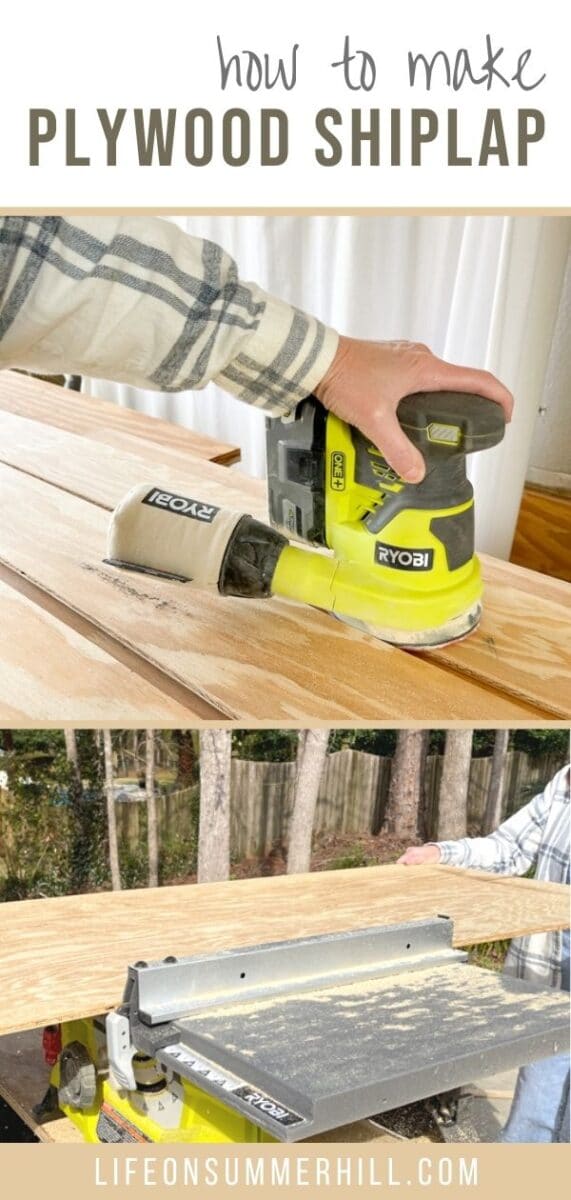
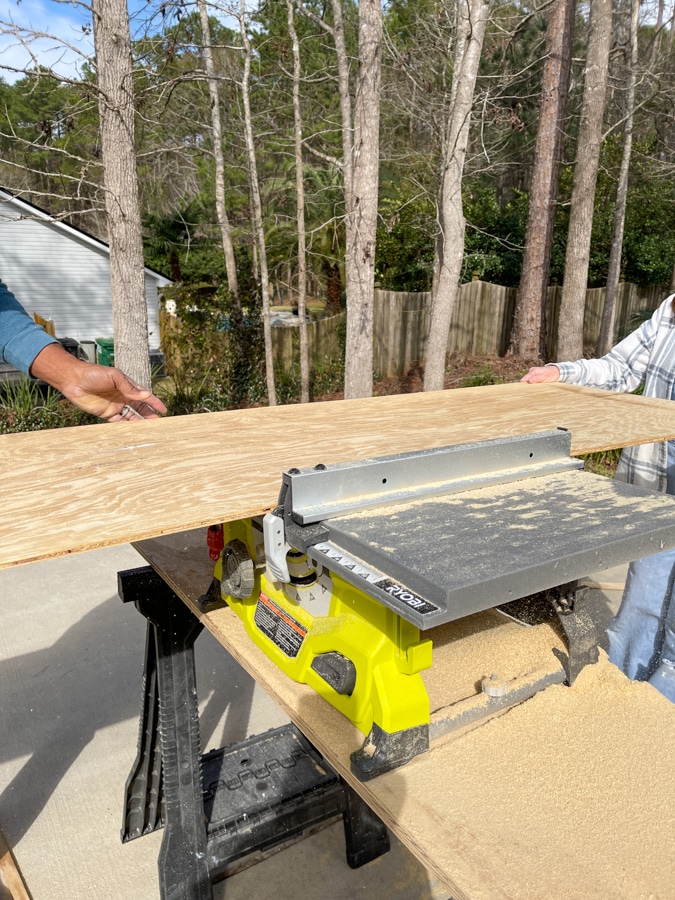
Begin by cutting your shiplap stripes from plywood sheets with a table saw. Set your table saw to 4 1/2″ wide. Then start running your boards through and cutting all the boards.
To make this easier get someone to help you by holding the other end of the board. It is also much easier to cut the sheet of plywood in half first than cutting all the shiplap planks.

Sanding Shiplap
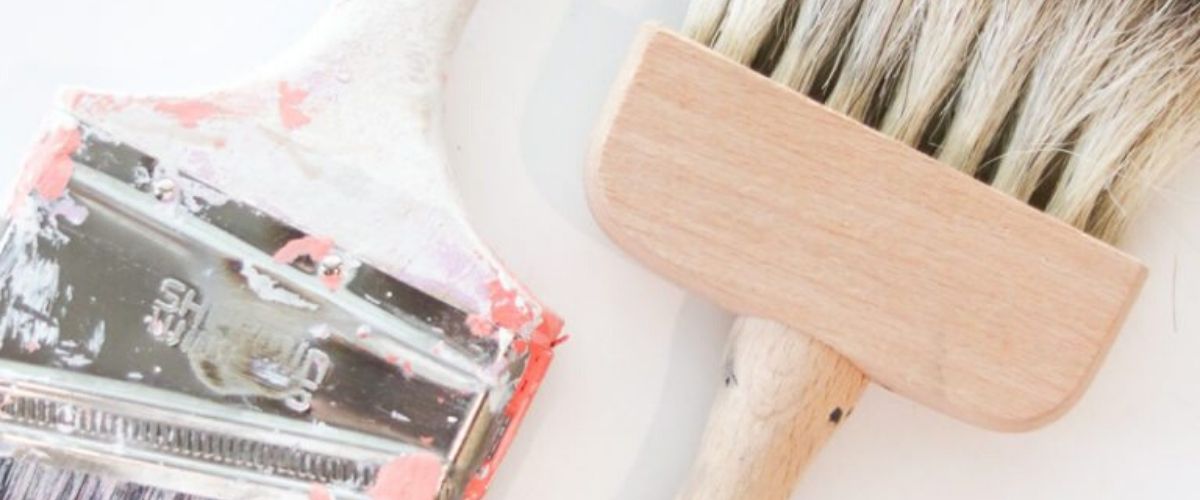
Once all your plywood strips are cut let's give them a good sanding. First look at both sides of each plank and pick out the one that looks the best. If there are any knots on one side I would turn it over. Choose the side with no knots and fewer imperfections unless you are going for a rough wall.
Now let's start smoothing down the boards and getting rid of any splinters. I used a medium grit first to sand each shiplap plank then I used a fine grit to polish the wood. They turned out nice and smooth but there were still not perfect which was exactly what we were going for.

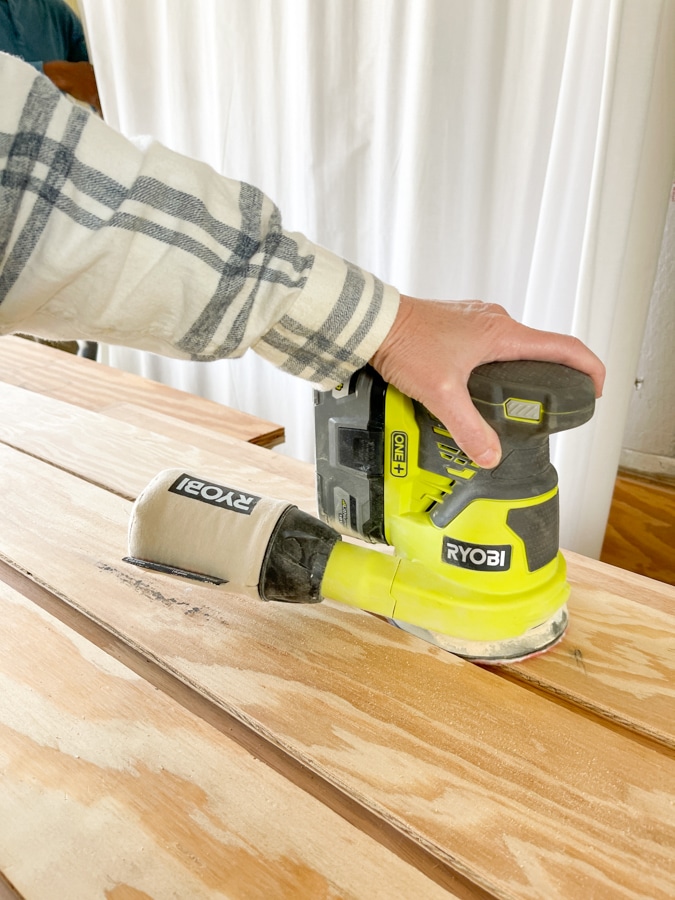
Once your sanding is complete wipe down the boards with a tack cloth. Actually, I used my blower to blow off any grit first and then used my tack cloth to remove any excess dust.
Remove the Basebaord
Next, we removed the baseboard. If you have never removed trim before here is a simple way to do it. First, take a utility knife and break the caulk line that runs at the top of the quarter round or shoemold. You will remove this part first. Some people don't have this trim piece. If that is you then you keep reading because it is basically the same steps.
Now that the caulk line has been broken with the utility knife place a putty knife down between the boards and pull towards you a little. Move the putty knife down and repeat. Then move it down again and repeat.
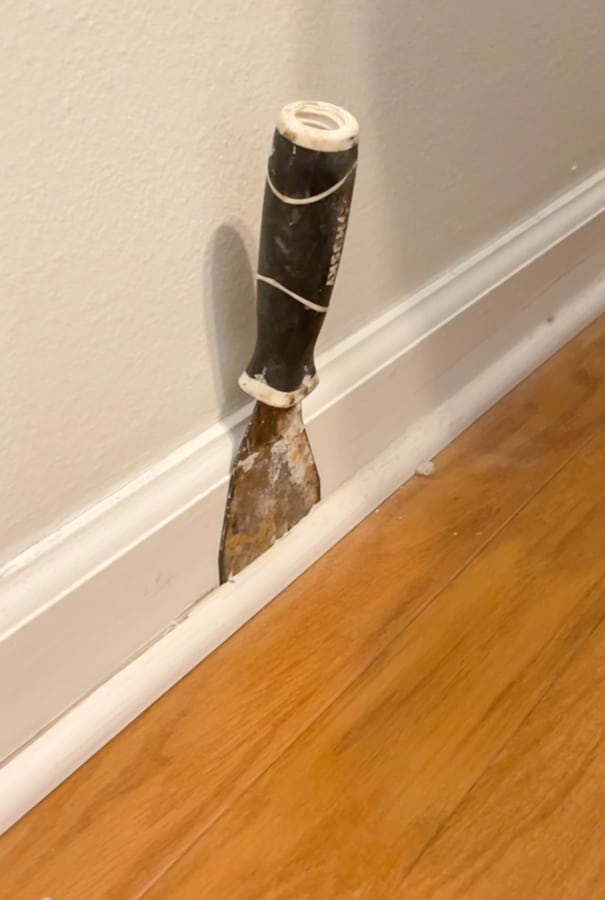

Basically, you want to inch the shoemold out from the baseboard a little at a time doing it more and more until the board comes off in one piece.
Next, you will repeat this process with the baseboard. If your baseboard is sticking to the wall you may need to use a crowbar or hammer to help pull it out. Once the base is off you will be exposing the bottom of the wall.
Hanging Shiplap Planks
Now determine where your studs are in the wall. You will be shooting nails into the board and securing it into the studs. Once you have an idea where the studs are make a pencil line on the sheetrock so you know where to shoot into the boards
Next, if you are hanging your shiplap vertically begin by hanging the second board first from the corner. Measure over about 3 inches give or take and use your level to make the board perfectly vertical and shoot in nails into the studs.
Follow by measuring from the corner to the first board at the top, middle and bottom. Once you have those measurements grab another board and mark those measurements on the board.
Next, using your chalk line pop a line over those marks and rip the board down with the handheld saw. Then see if the board will fit. If it is a little big you can sand the edge some to fit it into the corner. Once it fits, nail it onto the wall.
The next steps are pretty easy. You will continue to add boards leaving a slight gap, nickel gap, between them. You can make them flush if you like that look better but we wanted the vertical seams to really show so we placed a little bit of a gap.

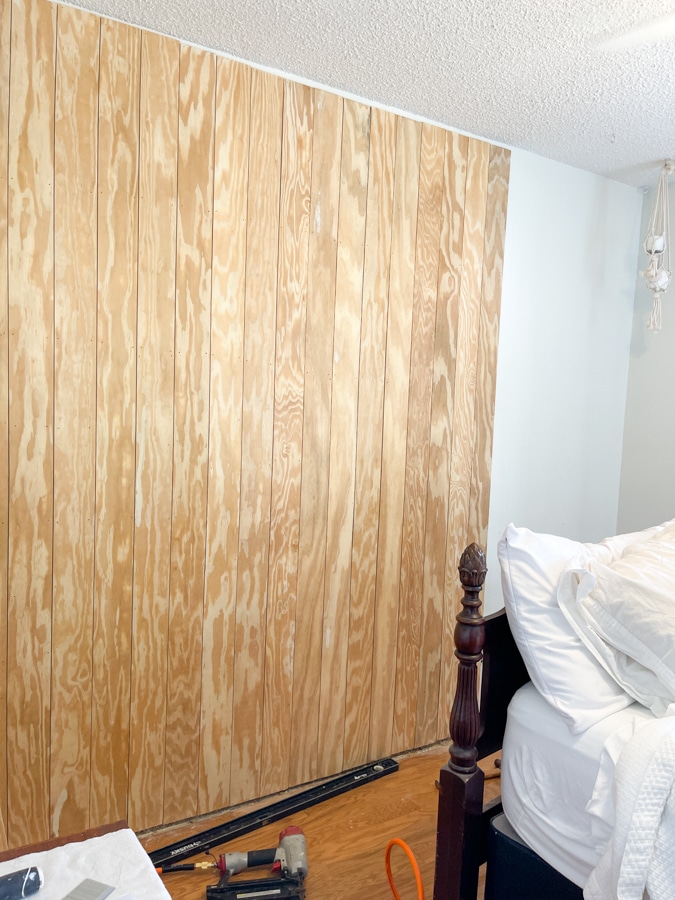
When you get to the last board you will measure and cut just like the other corner board. Before you know it, you've covered the whole wall.
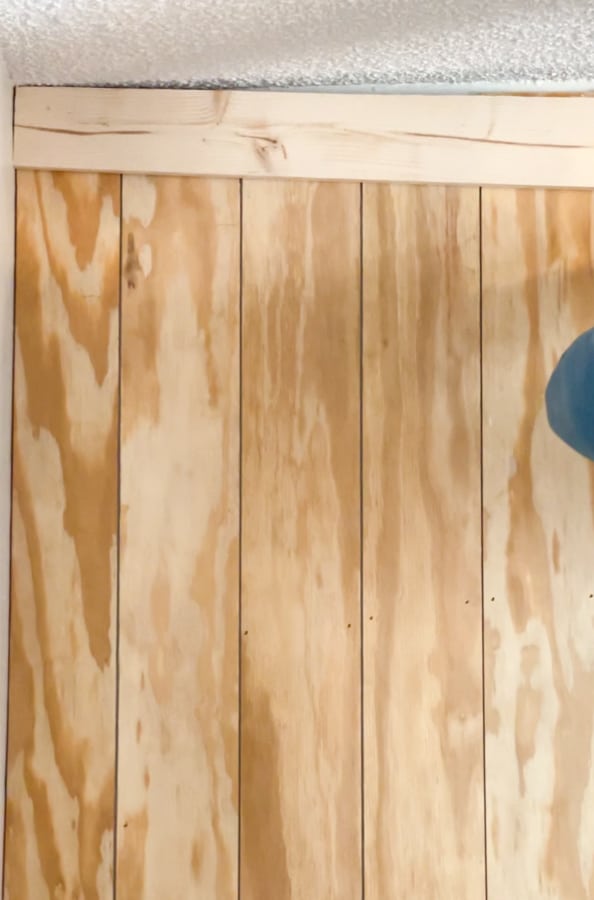
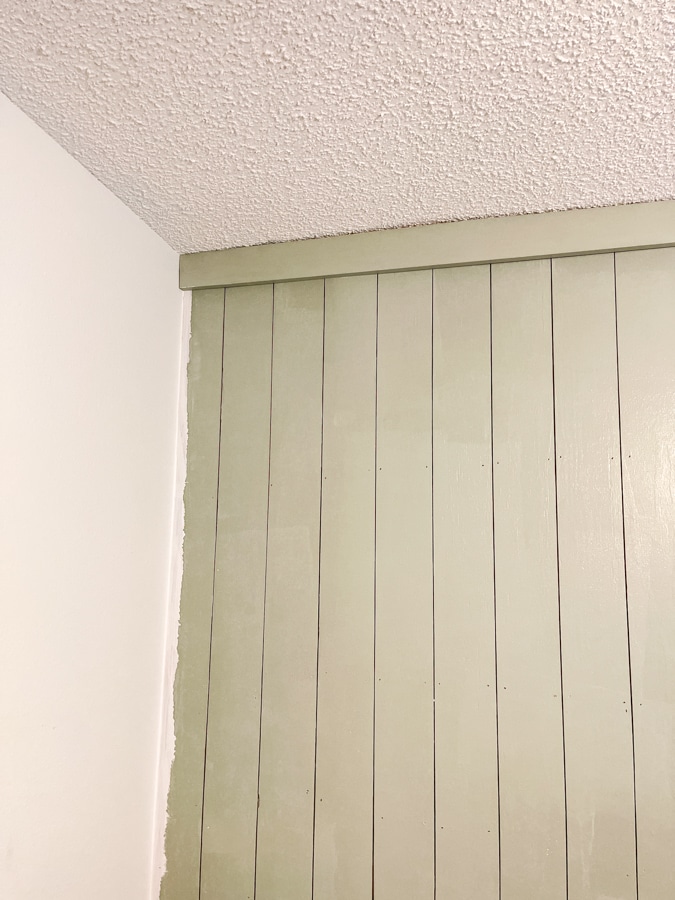
Crown Mold for Shiplap
Next, if you planned a crown trim piece for your shiplap simply measure the width of the wall at the top. Cut your board to size with the miter saw.
Place your board up at the top of the wall and shoot a nail into the center to secure it. Then nail on the ends and nail between. I like to add crown molding this way so I can bend the board if needed to get it tight on the ceiling.

How to Add Baseboard to Shiplap
Now it is time to put the baseboard back over the plywood shiplap. First, if you are using the old baseboard remove the nails and clean up any caulk with the utility knife.
Then use the utility knife or Dremel to cut away at the side boards so the new board will fit in. If it is not perfect you can cover it with caulk. If you have a Dremel it is faster to trim down the baseboards on the sides.
Basically, measure back about 1/4″ and make a mark. Then cut at an angle. You will need to trim down the shoe mold too because you will be adding the shoe mold next.
Now place your baseboard up against the wall covering the ends of the board to the floor and shoot in the nails. Then set the shoemold and nail it into place.
How to Paint Plywood Shiplap
Are you starting to see this come together?
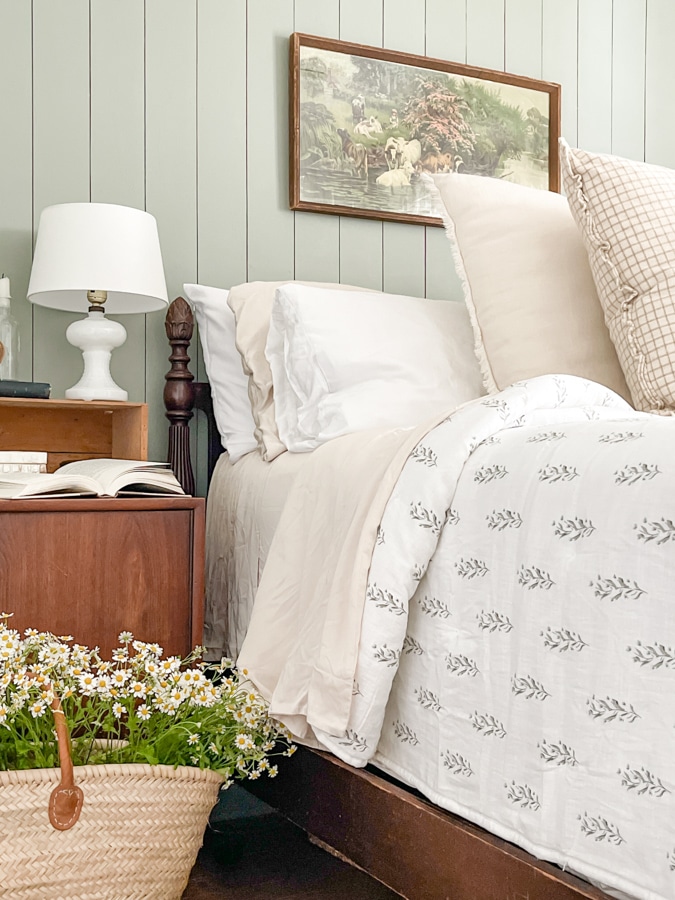
If you want to show the natural wood you will stop here or you can add stain or clear coat. But we have plans for a gray-green paint color called Escape Gray by Sherwin Williams. This color is right next to Sherwin Williams color of the year 2022 Evergreen Fog but we felt Evergreen Fog was a little too dark for this bedroom so we went one shade lighter.
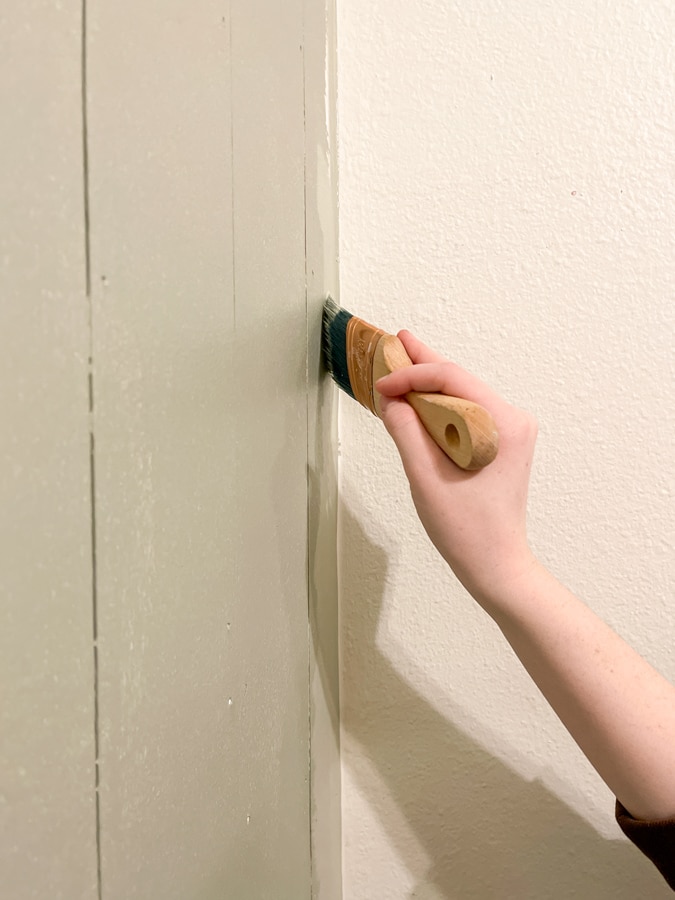
To paint your plywood shiplap begin by spackling or adding paint putty to all the nail holes. Once the spackle is dry, sand if needed. Caulk your baseboard, shoe-mold, and the crown at the ceiling if needed. We decided not to caulk our crown because we like how it looked up at our ceiling. You be the judge at your home.
Next, add a good primer. We used Kilz 3 and rolled on a good coat of primer. Give the primer about an hour to dry.

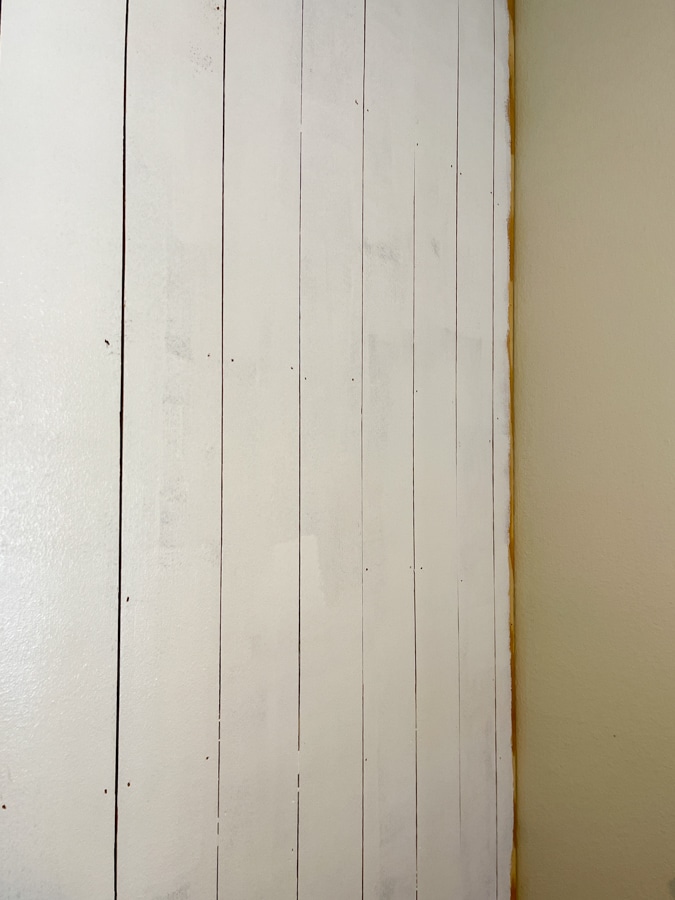
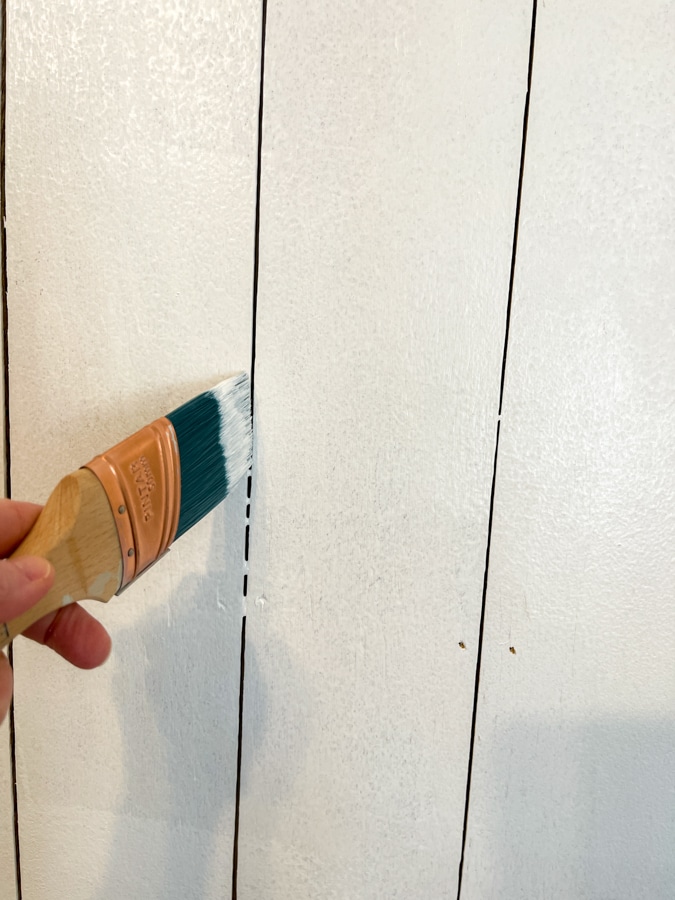
When you finish priming the wall go back with your paintbrush, while the paint is wet, and remove where the paint has filled in the small gaps between the edges of the boards.

Next, roll on your paint color. If you are using a darker color you need two coats. After the first coat of paint, we decided we needed two coats of paint.

And just like before, remove the paint between the gaps. Here is an easy way to get your lines on the ends nice and straight. You can use painter's tape or use a firm angled paintbrush. Keep your wrist tight and angle into the corner and pull down.

And guess what? Your plywood shiplap wall is finished. Yay!!
Conclusion
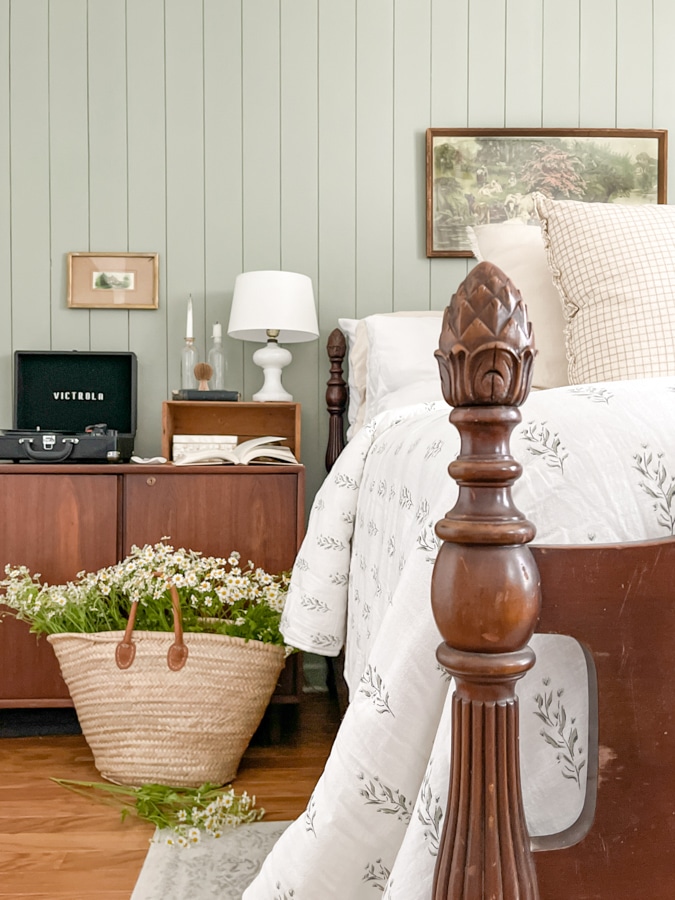
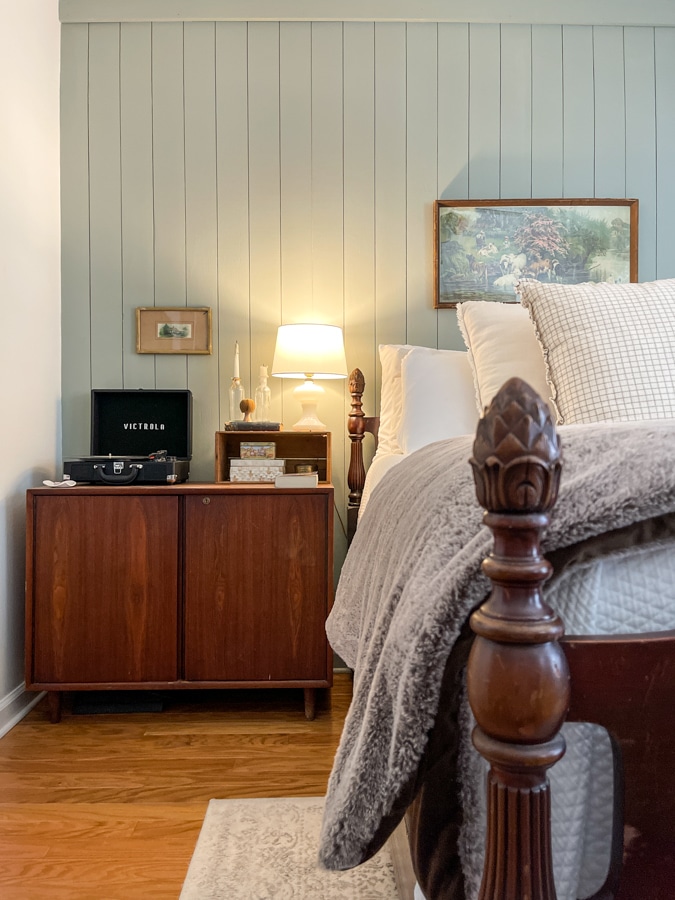
We cannot get over how beautiful this vertical shiplap wall turned out. You would never know from the finished look that it is plywood. And it made a huge difference in the feel of the room.
After we put all the furniture back in the room I couldn't believe how much it reminded me of the rustic look of my grandma's early 1900s home. I truly miss her but something about this wall gave me a sweet feeling inside. Read more about how we chose to decorate this antique vintage aesthetic bedroom.

I hope you have found this DIY plywood shiplap wall helpful. You can use this for a large wall or a small space. Give it a try.
Plywood shiplap walls are a great way to change or enhance the feel of a room. It will add so much character to your farmhouse decor, vintage decor, french country decor, English cottage decor or pretty much any style of design. Check out my post on cottagecore bedroom ideas for more decor ideas that work great with shiplap.
If you make your own plywood shiplap wall, I'd love to hear how it goes!
Happy Decorating!


How to Make Shiplap with Plywood

If you want to transform a room into an old vintage farmhouse style then you will love this vertical shiplap.
Materials
- 1/4" sanded pine plywood
- 1 x 4 wood
- Spackle or painters putty
- Kilz 3 Primer (if you plan to paint)
- Paint (we used Sherwin Williams Escape Gray SW 6185)
Tools
- Table Saw (we use Ryobi products)
- Stud finder
- Miter saw
- Skill saw
- Sander (with medium and fine grit)
- Tack cloth
- Level
- Chalk line
- Nail gun (you can also use a hammer and finishing nails)
- Pencil
Instructions
- Begin by cutting your shiplap stripes from plywood sheets with a table saw. Set your table saw to 4 1/2" wide. Then start running your boards through and cutting all the boards. To make this easier get someone to help you by holding the other end of the board. It is also much easier to cut the sheet of plywood in half first than cutting all the shiplap planks.
- Once all your plywood strips are cut let's give them a good sanding. First look at both sides of each plank and pick out the one that looks the best. If there are any knots on one side I would turn it over. Choose the side with no knots and fewer imperfections unless you are going for a rough wall.
- Now let's start smoothing down the boards and getting rid of any splinters. I used a medium grit first to sand each shiplap plank then I used a fine grit to polish the wood. They turned out nice and smooth but there were still not perfect which was exactly what we were going for. Once your sanding is complete wipe down the boards with a tack cloth. Actually, I used my blower to blow off any grit first and then used my tack cloth to remove any excess dust.
- Next, we removed the baseboard. If you have never removed trim before here is a simple way to do it. First, take a utility knife and break the caulk line that runs at the top of the quarter round or shoemold. You will remove this part first. Some people don't have this trim piece. If that is you then you keep reading because it is basically the same steps. Now that the caulk line has been broken with the utility knife place a putty knife down between the boards and pull towards you a little. Move the putty knife down and repeat. Then move it down again and repeat.
- You want to inch the shoemold out from the baseboard a little at a time doing it more and more until the board comes off in one piece, exposing the bottom of the wall. Next, you will repeat this process with the baseboard. If your baseboard is sticking to the wall you may need to use a crowbar or hammer to help pull it out.
- Now determine where your studs are in the wall. You will be shooting nails into the board and securing it into the studs. Once you have an idea where the studs are make a pencil line on the sheetrock so you know where to shoot into the boards.
- Next, if you are hanging your shiplap vertically begin by hanging the second board first from the corner. Measure over about 3 inches give or take and use your level to make the board perfectly vertical and shoot in nails into the studs.
- Follow by measuring from the corner to the first board at the top middle and bottom. Once you have those measurements grab another board and mark those measurements on the board.
- Next, using your chalk line pop a line over those marks and rip the board down with the handheld saw. Then see if the board will fit. If it is a little big you can sand the edge some to fit it into the corner. Once it fits, nail it onto the wall.
- You will continue to add boards leaving a slight gap between them. You can make them flush if you like that look better but we wanted the vertical seams to really show so we placed a little bit of a gap.
- When you get to the last board you will measure and cut just like the other corner board. Before you know it, you've covered the whole wall.
- If you planned a crown trim piece for your shiplap simply measure the width of the wall at the top. Cut your board to size with the miter saw.
- Place your board up at the top of the wall and shoot a nail into the center to secure it. Then nail on the ends and nail between. I like to add crown molding this way so I can bend the board if needed to get it tight on the ceiling.
- Now it is time to put the baseboard back over the plywood shiplap. First, if you are using the old baseboard remove the nails and clean up any caulk with the utility knife.
- Then use the utility knife or Dremel to cut away at the side boards so the new board will fit in. If it is not perfect you can cover it with caulk. If you have a Dremel it is faster to trim down the baseboards on the sides. Basically, measure back about 1/4" and make a mark. Then cut at an angle. You will need to trim down the shoe mold too because you will be adding the shoe mold next.
- Now place your baseboard up against the wall covering the ends of the board to the floor and shoot in the nails. Then set the shoemold and nail it into place.
- If you want to show the natural wood you will stop here or you can add stain or clear coat.
- To paint your plywood shiplap begin by spackling or adding paint putty to all the nail holes first. Once the spackle is dry, sand if needed. Caulk your baseboard, shoe-mold, and the crown at the ceiling if needed. We decided not to caulk our crown because we like how it looked up at our ceiling. You be the judge at your home.
- Next, add a good primer. We used Kilz 3 and rolled on a good coat of primer. Give the primer about an hour to dry.
- When you finish priming the wall go back with your paintbrush and remove where the paint has filled in the small gaps between the edges of the boards.
- Next, roll on your paint color. If you are using a darker color you need two coats.
- And just like before, remove the paint between the gaps. Here is an easy way to get your lines on the ends nice and straight. You can use painter's tape or use a firm angled paintbrush. Keep your wrist tights and angle into the corner and pull down.
- And guess what? Your plywood shiplap wall is finished. Yay!!
Notes
The cost listed does not include the power tools used as we already owned those.