


Today I am sharing how to make a Christmas village wreath. If you have seen this adorable wreath on Martha Stewart's website or Anthropologie, you are in for a treat. This DIY Christmas village wreath is so easy to make, and it takes only a couple of hours.


If you have been around me long, you know I love to decorate for Christmas with gingerbread houses or mini Christmas villages. Anything I can transform into a village is one of my favorite things. In fact, years ago, I made an apple tea light Christmas village.
But recently, my daughter shared Anthopolgies Christmas village wreath with me, and I thought what a cute idea until I saw the price of around $200. So I decided this is worth trying to make where it fits my Christmas theme this year.
Next, after thinking about it more, I researched and discovered that Martha Stewart's putz house wreath might very well be the originator of this adorable idea. But then I found this Thomas Kinkade Christmas village wreath. So many ideas to pull from for our wreath.
Now all these wreaths are so cute, but I wanted to minimize it a little. With the help of my daughter, Hannah, here is how to make a DIY Christmas village wreath.
This post contains affiliate links, meaning I receive a commission if you purchase using the links below at no extra cost to you. All opinions are all my own.
Gather Your Supplies
- 24″ flocked wreath (I found mine at Walmart)
- Lightweight village houses (Mine came from Target dollar spot, but I found more on eBay.)
- Glue gun and glue
- Floral wire
- Blue Velvet Ribbon
- White sheer ribbon
- Wire cutters
- Bottlebrush trees (I got mine from Dollar Tree)
- Polyfil (used for snow)
How to Make a Christmas Village Wreath Step by Step?
Creating a Christmas village wreath couldn't be easier! Beautiful Christmas decorations don't have to be expensive. If you follow this step by step instructions, you'll have an inexpensive way to make your very own beautiful wreath this holiday season.
This may be your favorite holiday decor this year. The fun thing about this project is that each wreath you make will end up a little different, so they will be one of a kind.
Step 1: Wreath Form
Start with a 20″ flocked wreath on a flat surface.


Step 2: Village House Layout
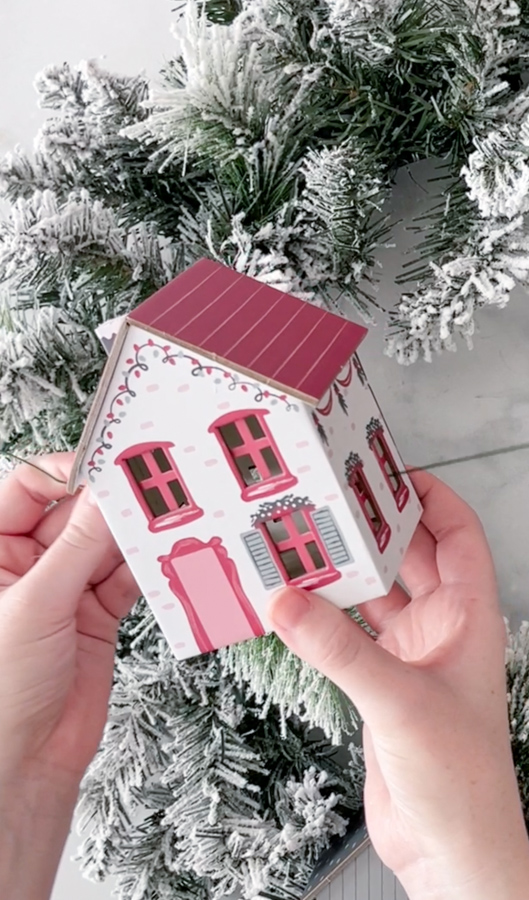
Take your village houses and lay them out on the wreath to determine where you want them.


Step 3: Attach Village Houses
Once you're happy with the placement of the houses, take your floral wire and weave it through the windows on the back of the houses and wrap the wire around the wreath frame. If you use any three-story houses, put the wire through the middle windows to keep the house secure. Repeat with each of the little houses.

Step 4: Fluff the Greenery
Cut off the excess wire on the back of the wreath with your wire cutters. Fluff up the wreath around the houses. You want them lying flat against the wreath frame.
Step 5: Hot Glue Snow
Use your hot glue gun to place a little bit of glue on the bottom of the house, and use the polyfill to create “snow” along the house's base and out to the side of the house.
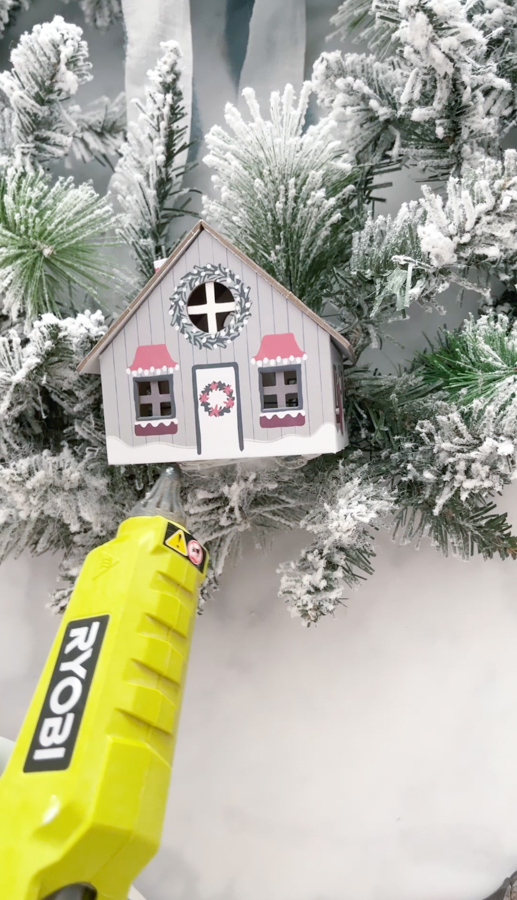

Repeat for each of your houses.


Step 6: Ribbon Bow
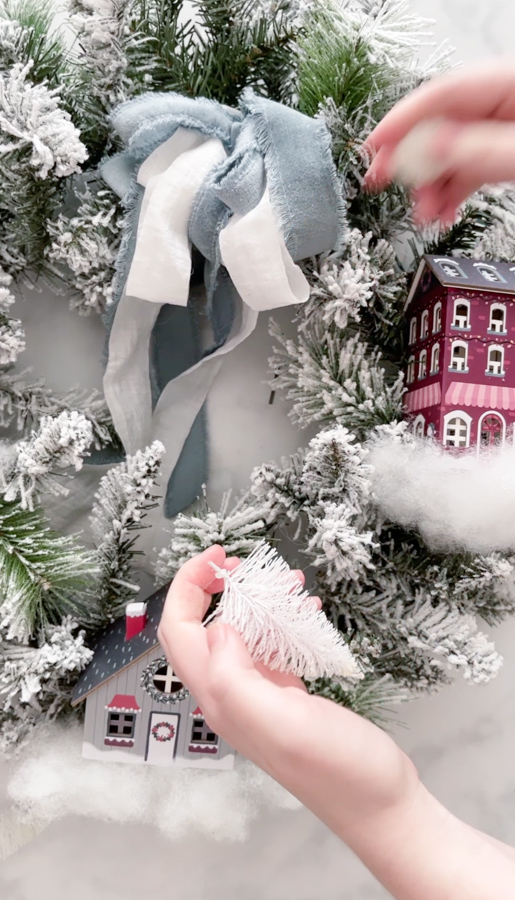
Next, I attached the ribbon in three layers to the top of the wreath, alternating blue velvet ribbon and a linen sheer white ribbon. To do this, I created several loops with each ribbon, secured them with the floral wire, and attached them to the wreath frame just like I did with the houses.


Side note – This is the same blue velvet ribbon I've used throughout my blue Christmas decorations ideas with hints of vintage Victorian. It is my favorite ribbon this holiday season and looks perfect on my winter village wreath.
Step 7: Remove Bottle Brush Tree Base
Next, I took the base off the white bottle brush trees and positioned them in the wreath until I was happy with the layout. I placed trees around the village houses and throughout the wreath to give it a mountainy vibe.

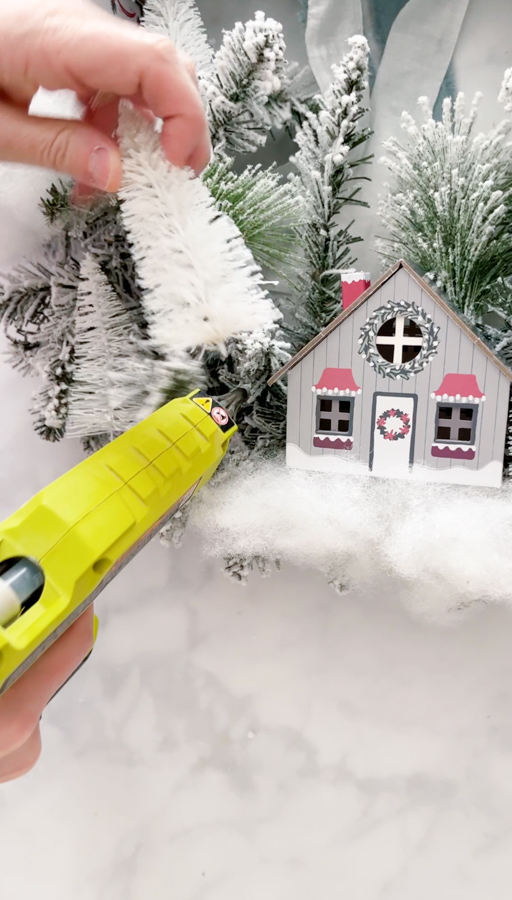
Step 8: Glue Bottle Brush Trees & Snow
Then I used my glue gun, dabbing a bit of glue into the wreath and nestling each tree into the glue. Next, I added more snow around the trees, securing it with my glue gun, and then fluffed up the greenery around the wreath once the pieces are in place.

That's it! Your beautiful Christmas village wreath is done.
Where to Hang your Christmas Village Wreath
I chose to hang my wreath project from a hook in my kitchen, but you can hang it over a large mirror, inside a frame, on your wall, or inside a door. You can get another look at my Christmas village wreath in my Christmas candlelight home tour.
If your village houses are cardboard, like mine, then I would keep it indoors, but if your wreath can withstand weather, then it would be cute hanging on your front door. This wreath would look amazing, with fairy lights woven inside the greenery.
This fun Christmas wreath looks fantastic! You can also check out how to hang your wreath from a window. Find other great ideas for decorating with wreaths here.
Final Thoughts
What do you think? Are you ready to make a Christmas village wreath for your own home? I was surprised by just how easy it was and so much fun.
This Christmas village wreath would also make a great gift for your friends and loved ones. You can personalize each wreath by designing it in different ways. It's sure to spread holiday cheer.
I'd love to hear how your wreath turns out or what other DIY Christmas wreath ideas you have to share. Happy holidays!
Happy Decorating!


How to Make a Christmas Village Wreath
Learn how to make a Christmas village wreath. This DIY Christmas village wreath is so easy to make, and it takes only a couple of hours.
Materials
- 20" flocked wreath (I found mine at Walmart)
- Lightweight village houses
- Floral wire
- Blue Velvet Ribbon
- White sheer ribbon
- Bottlebrush trees (I got mine from Dollar Tree)
- Polyfil (used for snow)
Instructions
- Start with a 20" flocked wreath on a flat surface.
- Take your village houses and lay them out on the wreath to determine where you want them.
- Once you're happy with the placement of the houses, take your floral wire and weave it through the windows on the back of the houses and wrap the wire around the wreath frame. Repeat with each of the little houses.
- Cut off the excess wire on the back of the wreath with your wire cutters. Fluff up the wreath around the houses. You want them laying flat against the wreath frame.
- Use your hot glue gun to place a little bit of glue on the bottom of the house and use the polyfil to create "snow" along the base of the house and out to the side of the house.
- Repeat for each of your houses.
- Attach the ribbon in three layers to the top of the wreath, alternating blue velvet ribbon and a white sheer ribbon. To do this, I created several loops with each ribbon and secured them with the floral wire and attached them to the wreath frame just like I did with the houses.
- Take the base off of the white bottle brush trees and positioned them in the wreath until I was happy with the layout. I placed trees around the village houses but also throughout the wreath to give it a mountain-y vibe.
- Then I used my glue gun, dabbing a bit of glue into the wreath and nestling each tree into the glue. Then I added more snow around the trees, securing it with my glue gun. Fluff up the greenery around the wreath once all of the pieces are in place. That's it!
Notes
- If you are using any three-story houses, put the wire through the middle windows to keep the house secure.
- If you use cardboard houses like I did, you'll want to keep this wreath inside the home to protect it from weather.